tags
Film Project ‘The Journey’
We are creating a horror style themed short film.
I am in a group of 5.
For the location we are filming it at our school, we are going to shoot the film at night so we can create the atmosphere that we are looking for to set the scene with our ideas.
We are going to take the story of being locked inside the school with two – three people being watched and followed in the darkness by some sort of ‘entity’, we are going to perhaps edit the ‘entity’ in or we will film it as if something is there, we are debating whether to end the film on a cliff hanger on not.
We are going to use the Utopia sound track in the background for audio which will help set the scene, this is because the music has strange beats and songs.
Bauhaus Logo Café
Surreal
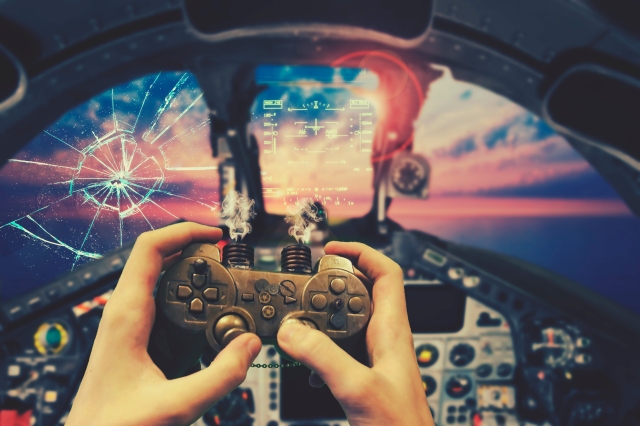
Here I have used my Steampunk item to create a surreal image.
To create this surreal image I used the opacity tool, the copy and paste tool, the screen tool, on the smoke, the lens flare tool, also I used to Gaussian Blur tool to create the feel of the image as the controller being in focus rather than the actual image, I had to use the pen tool to erase the windows of the jets cockpit to add the image behind the layer so it looked like it was looking out, the colour correction that I made with the brightness and contrast with the exposure and the offset, I also used the curves to create a cross process effect, I had to erase the green screen from the controller image so it looked like it was in the cockpit, also the controller is reflected on the glass as I duplicated the layer and lowered the opacity and moved it onto the window and used the perspective transform tool to make it look realistic, I also used the transform tools on the smoke to make it look like it is coming from the controller.
Steps to build the short film.
 Here is the first step to creating the film; I had to use a green-screen in the backdrop, this then can be removed by using a keylight on adobe after affects. After I added the video onto the screen, this is the overall outcome so far.
  As you can see I have also added smoke effects out from the pipes to add effect, I motion tracked them so they move with the controller, also I added a filter on the whole clip to add a grundgy effect which makes the video look more authentic and adds tone.
Finished Controller:
Here is the finished controller, I have tried to stick to the design as much as I could, but some things were just not possible.
The tone of the paint works well with the contrast of the silver dry brush, the bronze tubing at the top works well as it stands out against the cogs and the silver paint, the chain is stuck on by glue which adds effect to the controller and fits the gold theme.
I am overall pleased with this design because it suits the theme and matches it very well.
If I were to improve anything, I would have painted the analogue stick and the buttons different colours, like bronze or black to add effect.
Items that were used:
Here were some tools that were used involving the creation of my steampunk creation.
The glue gun was used to stick the cogs onto the controller along with the pipes at the top, the metal was also stuck on with the glue gun.
The cogs were from a shop in Colchester which I purchased, these were used to stick on my controller, this adds the effect of the mechanics of the controller, the gold paint was used to paint the controller the gold.
Steam punk project:
Here I have started with my PS3 controller, my first step was to spray paint the whole controller gold, this gives it they added theme and the texture that I wanted, the paint made the controller smooth and clean, this was the look that I was going for, from which I could then change the look and feel of the controller.
I acquired, some nuts and bolts, also I acquired a washer, I will be spray painting these brown to give the more tone. I will be acquiring some more of these small parts for my controller, I will probably find an old clock to take apart and take the cogs from which I will then use a glue gun to stick them onto the controller.
Lastly I have dry brushed my controller to add a scratched effect with silver paint, this involves getting paint on the brush and drying it all on paper and then transferring the brush to the controller in downward motions to apply the texture and look of the controller which I wanted to achieve.
I like the look of my controller at the moment as it looks completely different from the original black controller that I started off with, I want to hopefully re-create my design as much as possible, but I have to adapt my real life object a fair amount to achieve this.
The wanderer:
This was a manipulation of a photo of a train track, the train track itself was in colour and had cars in the distance which i cloned out, the light was reduced by brightness and the contrast was increased to add a gloomy effect, the rain was overlayed to add effect.
The girl was taken from google images and I used the pen tool to erase all the background around her, the radiation sign was created from images that were also taken from the internet.
The light was used by the brush tool, I used a new layer and the brush tool with a glow effect, I created another layer to create the light on the track by using a soft light filter.
Magazine Design:
Here is a steampunk mag, this is a fictional story by Katherine Mcintyre. This is what steam punk is, cogs, and modern retakes of old objects. The airship is an old invention, the magazine illustrator has been edited to look new and futuristic which is the idea of steampunk, the colour of the magazine is very bland and has very minimal colours, the tone of themagazine is very dull as the colours are brass. 


